Getting Started
Tutorial
Everything you need to go from zero to running autonomous coding agents.
Contents
Install claw-forge
We use uv for fast, isolated installation. It puts the claw-forge command on your PATH without polluting your system Python.
pip install uv
uv tool install claw-forge
claw-forge --version
pip install pipx
pipx install claw-forge
claw-forge --versionpip install claw-forge
claw-forge --versionclaw-forge ui) requires Node.js 18+. Install from nodejs.org if you want the visual board.
Set up environment variables
claw-forge reads credentials from environment variables. Copy the example file and fill in your keys:
cp .env.example .env
# Edit .env with your editor
The minimum you need to get started is one of the following:
# Run claude login once — claw-forge picks it up automatically.
# No env vars needed for OAuth. Token is read from:
#   ~/.claude/.credentials.json
claude login
# .env
ANTHROPIC_API_KEY_1=sk-ant-api03-...# .env — Anthropic-compat proxy
PROXY_1_API_KEY=your-proxy-key
PROXY_1_BASE_URL=https://your-proxy.example.com/v1
PROXY_1_MODEL=claude-sonnet-4-6claw-forge automatically loads .env from the same directory as claw-forge.yaml — no export or source needed.
.env.example covering every provider: Anthropic, proxies (with base_url + model), AWS Bedrock, Azure, Vertex AI, Groq, Cerebras, and Ollama. Copy it and fill in only what you use — unset vars produce a warning but won't crash the run.
Configure providers
Create claw-forge.yaml in your project root. Every credential is read from env vars — never hardcode keys.
pool:
  strategy: priority
  max_retries: 3

providers:
  claude-oauth:
    type: anthropic_oauth
    priority: 1
    # Token auto-read from ~/.claude/.credentials.json
pool:
strategy: priority
max_retries: 3
providers:
claude-oauth:
type: anthropic_oauth
priority: 1
anthropic-primary:
type: anthropic
api_key: ${ANTHROPIC_API_KEY_1}
priority: 2
groq-backup:
type: openai_compat
api_key: ${GROQ_API_KEY}
base_url: https://api.groq.com/openai/v1
model: llama-3.3-70b-versatile
priority: 3pool:
strategy: priority
max_retries: 3
providers:
# Anthropic-format proxy (x-api-key + /v1/messages)
anthropic-proxy-1:
type: anthropic_compat
api_key: ${PROXY_1_API_KEY}
base_url: ${PROXY_1_BASE_URL}
model: ${PROXY_1_MODEL}
priority: 1
anthropic-proxy-2:
type: anthropic_compat
api_key: ${PROXY_2_API_KEY}
base_url: ${PROXY_2_BASE_URL}
model: ${PROXY_2_MODEL}
priority: 2pool:
strategy: priority
max_retries: 3
providers:
# Ollama — local model, zero cost
local-ollama:
type: ollama
base_url: ${OLLAMA_BASE_URL}
model: ${OLLAMA_MODEL}
priority: 1
cost_per_mtok_input: 0.0
cost_per_mtok_output: 0.0
# .env:
# OLLAMA_BASE_URL=http://localhost:11434
# OLLAMA_MODEL=qwen2.5-coderThe pool manager routes each request through providers in priority order, skipping any that are rate-limited or have open circuit breakers.
| Field | Required | Description |
|---|---|---|
| type | required | anthropic · anthropic_compat · anthropic_oauth · openai_compat · bedrock · azure · vertex · ollama |
| priority | required | Lower = tried first. Providers with the same priority compete via the routing strategy. |
| api_key | optional | Use ${ENV_VAR} syntax. Omit for OAuth or no-auth proxies. |
| base_url | optional | Required for proxy and Ollama types. Use ${ENV_VAR}. |
| model | optional | Default model for this provider. Use ${ENV_VAR}. Falls back to the request model if unset. |
| model_map | optional | Map model names for proxies that use different identifiers. |
| cost_per_mtok_input | optional | USD per million input tokens. Used for cost tracking in the Kanban UI. |
Bootstrap your project
Run claw-forge init first — before writing a spec. This scaffolds the .claude/commands/ folder (including the /create-spec slash command you'll need in the next step) and creates default config files if they don't exist yet.
cd my-project
claw-forge init

# Or bootstrap a specific directory without cd:
claw-forge init --project ~/projects/my-app/create-spec slash command lives in .claude/commands/ — it only exists after claw-forge init runs. Without bootstrapping first, you'd have no spec template to work from. Think of this step as installing the toolkit.
Write your project spec
Now that .claude/commands/ exists, open Claude Code in your project directory and use the /create-spec command — or write the spec manually. The spec describes what you want to build; the init agent reads it and breaks it into parallel tasks.
You have three ways to create a spec:
Best control. Use the format below.
Interactive. Claude walks you through it conversationally.
Paste a PRD, Notion doc, or README — Claude extracts the spec.
Option A — Write app_spec.txt yourself
The format is human-readable and intentionally flexible. The key thing is to be specific about acceptance criteria — vague features produce vague code.
- One feature = one atomic unit of work. If it takes more than ~2 hours to implement, split it.
- Acceptance criteria are tests. Write them as if they're a checklist for the agent to verify before marking the feature done.
- Use
Depends on:for hard dependencies. Features with no dependencies run in parallel in Wave 1. - Tech notes help. If you have a preferred library or pattern, mention it. Agents follow instructions well.
- Start with 5–10 features. You can always add more with
/expand-projectonce the first wave is running.
Option B — Interactive spec with /create-spec
Open Claude Code in your project directory and type /create-spec. Claude will walk you through the project conversationally — asking about your stack, features, providers, and concurrency — then write both app_spec.txt and claw-forge.yaml for you.
# Open your project in Claude Code, then type:
/create-specOption C — Convert an existing PRD
If you already have a PRD, Notion export, or detailed README, claw-forge init copies app_spec.example.xml into your project so Claude knows the exact format. Paste your PRD into Claude and use this prompt:
Because app_spec.example.xml is already in the project directory, Claude Code reads it automatically and produces valid XML — no guessing the format.
Initialize with your spec
Now run claw-forge plan app_spec.txt. The initializer agent reads your spec, analyzes the project directory, and creates a dependency-ordered task graph in the state database.
claw-forge plan app_spec.txt --project task-manager-apiThe initializer also writes .claw-forge/session_manifest.json — a pre-computed context blob that every subsequent agent session loads at start. This eliminates cold-start: agents don't re-analyse the project from scratch each time.
init again on an existing project will add new tasks — it won't delete existing ones. Use /expand-project to add features to a running session instead.
What the manifest contains
You can inspect it any time:
cat .claw-forge/session_manifest.jsonRun agents
Start the harness. The dispatcher executes features in dependency-ordered waves — features with no unsatisfied dependencies run in parallel up to --concurrency.
claw-forge run --project task-manager-api --concurrency 3The state service runs automatically on port 8420. Open http://localhost:8420/docs to explore the REST API, or use the Kanban UI (next step).
| --concurrency N | Max parallel agents (default: 5) | |
| --model MODEL | Override the default model | |
| --config FILE | Use a different claw-forge.yaml | |
| --yolo | Max speed, no approval pauses (see YOLO mode) | |
| --dry-run | Print tasks in dependency order without executing |
Check provider health at any time:
claw-forge pool-status # show all providers, rate limits, and healthOpen the Kanban UI
claw-forge ships a React Kanban board that shows real-time agent progress, provider health, and cost. Launch it with one command:
claw-forge ui --session abc-123-defThe board opens automatically in your browser:
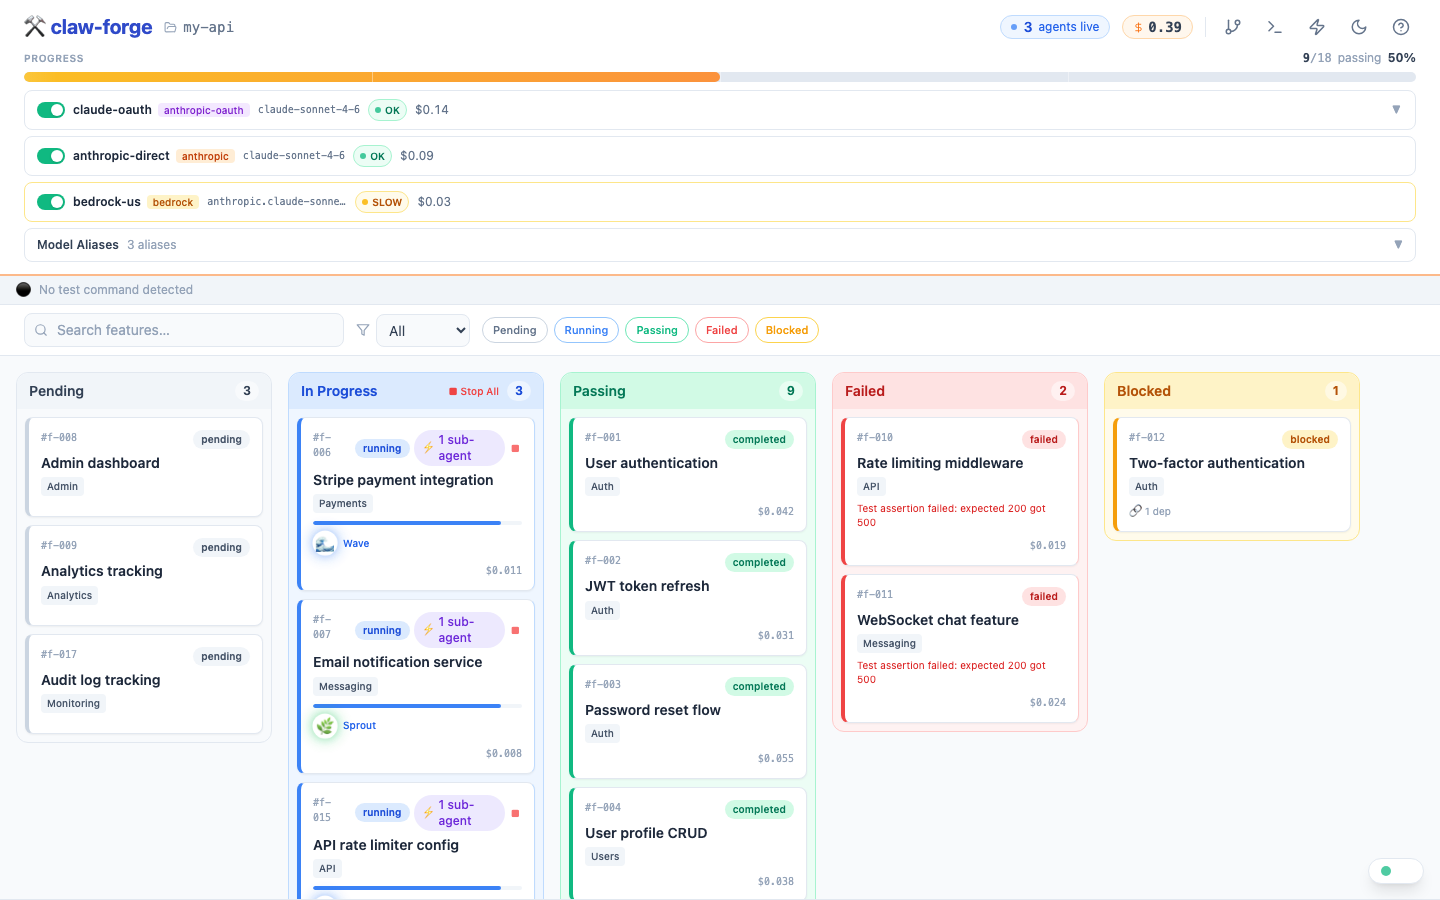
What you'll see:
- 5 columns: Pending · In Progress · Passing · Failed · Blocked
- Provider health dots in the header — click any dot for RPM, latency, circuit state, and cost
- Progress bar — X/Y features passing, live
- Cost tracker — total USD spent this session
- Feature cards — show category badge, dep count, agent session ID when running, error message when failed
claw-forge ui --port 3000        # custom port
claw-forge ui --no-open          # don't auto-open browser
claw-forge ui --state-port 9000 # different state service portclaw-forge dev to start the state service API and the Kanban UI in a single command with hot-reload:
claw-forge dev                          # state API + Vite UI, both with hot-reload
claw-forge dev --state-port 9000 --ui-port 3000   # custom ports
claw-forge dev --project /path/to/project --run   # also run agents
You can also open the board manually at any time at http://localhost:5173/?session=<uuid>.
Add more features
Once your first batch of features is running (or done), add more without restarting. There are two ways:
Option A — /expand-project slash command
Open Claude Code in your project directory and type /expand-project. Claude will list the current features, ask what you want to add, and POST them to the state service atomically.
/expand-projectOption B — append to app_spec.txt and re-init
Add new entries to the bottom of your spec file and run init again. Only new features (those not already in the DB) will be created.
# Append to app_spec.txt, then:
claw-forge plan app_spec.txt --project task-manager-apiYOLO mode — maximum speed 🚀
YOLO mode enables three things at once:
- Max concurrency — set to your CPU count automatically
- Auto-approve human inputs — agents never pause waiting for you
- Aggressive retry — 5 attempts per task instead of 3
claw-forge run --project task-manager-api --yolo- First-pass generation on a clean codebase
- Rebuilding from a fresh spec after a big refactor
- When you've already reviewed and trust the agent prompts
- Not recommended for production systems or when the codebase has sensitive operations
Pause & resume
Pause a running session gracefully — in-flight agents finish their current task, then no new ones start. Resume picks up exactly where it stopped.
# Pause (drain mode — active agents complete, no new ones start)
claw-forge pause abc-123-def

# Resume
claw-forge resume abc-123-defAnswer a stuck agent
If an agent has a question it can't answer on its own (a missing env var, an ambiguous requirement), it sets the task to needs_human and waits. Use claw-forge input to unblock it:
claw-forge input abc-123-defWorkflows
Choose the workflow that matches your situation. Each one chains commands in the right order.
Greenfield — Build a new app from scratch
claw-forge init → /create-spec → claw-forge plan app_spec.txt → claw-forge run → /check-code → /checkpoint → /review-prExample: Building "TaskFlow API" (FastAPI + SQLite)
# 1. Scaffold project
mkdir taskflow-api && cd taskflow-api && git init
claw-forge init

# 2. Create spec interactively (in Claude Code)
#    Type: /create-spec
#    Claude asks about features, tech stack, DB schema
#    Writes: app_spec.txt + claw-forge.yaml

# 3. Initialize with spec
claw-forge plan app_spec.txt --concurrency 5

# 4. Run agents (opens 5 parallel coding agents)
claw-forge state &
claw-forge run --concurrency 5

# 5. Verify (in Claude Code)
#    /check-code    → ruff + mypy + pytest
#    /checkpoint    → git commit + state snapshot
# /review-pr → structured code reviewclaw-forge plan on an existing project preserves completed tasks and only adds new features. Use --fresh to start a clean session.
Brownfield — Add features to existing code
claw-forge analyze → /create-spec → claw-forge add → claw-forge runExample: Adding Stripe payments to an existing FastAPI app
# 1. Analyze existing codebase (creates brownfield_manifest.json)
claw-forge analyze

# 2. Create brownfield spec (in Claude Code)
#    Type: /create-spec
#    Claude auto-detects brownfield mode from manifest
#    Asks: what to add, constraints, integration points
#    Writes: additions_spec.xml

# 3. Add features
claw-forge add --spec additions_spec.xml

# 4. Run agents
claw-forge run --concurrency 3

# 5. Verify
# /check-code (71 tests: 59 original + 12 new, all passing)Merging completed features
When using merge_strategy: manual, use claw-forge merge to squash-merge completed feature branches:
claw-forge merge                     # list ready feature branches
claw-forge merge feat/user-auth      # squash-merge a specific branch
claw-forge merge feat/user-auth --target develop  # merge into develop
Bug Fix — TDD regression fix
/create-bug-report → claw-forge fix → /check-code → /review-prExample: Fixing "password reset fails for uppercase emails"
# 1. Create bug report (in Claude Code)
#    Type: /create-bug-report
#    Claude guides you through 6 phases:
#      symptoms → reproduction → expected vs actual → scope → write report → fix
#    Writes: bug_report.md

# 2. Run fix (or let /create-bug-report trigger it)
# Fix from a bug description
claw-forge fix 'users get 500 on login with uppercase email'

# Fix from a structured bug report
claw-forge fix --report bug_report.md

# Fix without creating a branch
claw-forge fix --report bug_report.md --no-branch

# Agent does:
#   Phase 1 (RED):    Write test_password_reset_uppercase_email → FAILS ✓
#   Phase 2 (GREEN):  Fix auth/service.py → .lower() on email lookup → PASSES ✓
#   Phase 3 (REFACTOR): Run full suite → 72 passed, 0 failed ✓

# 3. Verify and push
# /check-code → /review-pr → git pushParallel Sprint — Multi-agent feature development
claw-forge run --concurrency 5 → claw-forge status → /pool-status → /checkpointExample: Building 50 features with 5 concurrent agents
# Three terminals:
claw-forge state &              # Terminal 1: state service
claw-forge run --concurrency 5  # Terminal 2: agents
claw-forge ui                   # Terminal 3: Kanban board

# Monitor mid-sprint:
claw-forge status               # Phase progress, blocked features, cost
#    /pool-status               # Provider health, RPM, circuit breakers

# Handle blocked features:
claw-forge input saas-platform  # Answer agent questions interactively

# Save progress at milestones:
# /checkpoint # Git commit + state snapshot--concurrency 3 to verify your spec, then scale up.
Recovery — Resuming after interruption
claw-forge status → claw-forge run → /expand-projectExample: Laptop shut down mid-sprint (28/50 features done)
# 1. Check what happened
claw-forge status
# Shows: 28 passing, 5 interrupted, 17 pending

# 2. Resume — interrupted features reset to pending automatically
claw-forge state &
claw-forge run --concurrency 5
# "Resuming session: 28/50 passing, 22 remaining"

# 3. Optionally add more features mid-run (in Claude Code)
#    Type: /expand-project
# Claude lists current features, asks what to add, POSTs atomicallyclaw-forge run again.
Which command do I use?
Start here
  │
  ├── Building something new?
  │     └── claw-forge init → /create-spec → claw-forge plan → claw-forge run
  │
  ├── Adding features to existing code?
  │     └── claw-forge analyze → /create-spec → claw-forge add → claw-forge run
  │
  ├── Fixing a bug?
  │     └── /create-bug-report → claw-forge fix
  │
  ├── Checking project health?
  │     ├── Code quality     → /check-code
  │     ├── Feature progress → claw-forge status
  │     └── Provider health  → /pool-status
  │
  ├── Saving progress?
  │     └── /checkpoint → /review-pr → git push
  │
  ├── Resuming after a break?
  │     └── claw-forge status → claw-forge run
  │
  ├── Pausing / resuming agents?
  │     └── claw-forge pause <session> → claw-forge resume <session>
  │
  ├── Agent asking a question?
  │     └── claw-forge input <session>
  │
  ├── Merging feature branches?
  │     └── claw-forge merge feat/branch-name
  │
  ├── Starting state service standalone?
  │     └── claw-forge state (--port, --database-url for PostgreSQL)
  │
  └── Adding features mid-run?
        └── /expand-project
What's next?
- Full feature list
- Commands reference — every flag and option
- Workflow walkthroughs — 5 end-to-end guides
- Claude Agent SDK API guide
- Architecture deep-dive
- Full config reference
- Write a custom plugin
- Add a skill for your tools
- Use the file rewind API to undo bad refactors
- Enable deep thinking for architecture tasks